Dependency Graph
The dependency graph is used to decide which buildings (and how many of them) appear in a settlement. The create settlement form uses a sensible default, which varies depending on the size of the settlement, and the landscape parameters. To manually configure the dependency graph, open the create settlement form > All settings > Buildings > Dependency graph.
Dependency graph node
Dependency graph nodes essentially configure how often certain buildings appear in a settlement. Dependency nodes are each linked to a resource/service that is produced in the settlement - for example hops, or beer, or hair cutting. Nodes can depend on a certain population, or on other nodes. For example, we could have this chain of nodes:
node: Hops provider
dependency: 1 per 200 people

node: Brewery
dependency: 1 per 5 hops providers
Given this config, FTG will place 1 brewery node for every 5 hops providers. By default, this isn't guaranteed to match the base ratio per person. Internally, FTG converts both of these nodes into a ratio per person (so hops would be 1 per 200 people, brewery would be 1 per 1000 people). FTG prioritises minimising the unemployment, so we might have this generation:
- Settlement empty, create new jobs, look at dependency nodes, see that hops is next on the list, use that.
- Internally, pretend (only for the sake of the dependency graph), that the population is now 200
- Create residents to fill jobs
- Need new jobs, there is nothing available, see that the next building to place (if there were more people) is a hops provider. Place that
- repeat steps 2-4 until the pretend population is 1000.
- Look the dependency graph, next building is brewery, place that.
- repeat until settlement population target is reached.
If you would like the generation to match the specified ratios, you can disable "Always place workplace" under Buildings > Overall Settings in the create settlement form.
Buildings
Each node is linked to a pool of buildings. When we say 'place a node', we really mean take a node, pick a random building from its pool, and place that building.
Each node has two types of building pools: core buildings that actually produce the resource, and shops that import the resource and then sell it in the settlement. If the core buildings pool is empty (e.g. if the buildings can't be created, for example if there is no farmland farms won't be created), shops will always be placed. Otherwise, there is a percent chance for shops to be created over the other buildings.
The core building pool can also be separated into multiple pools based on the lifestyle. When a building is created, it is assigned a lifestyle based on the lifestyle. For example, the default tavern building pool config looks like:
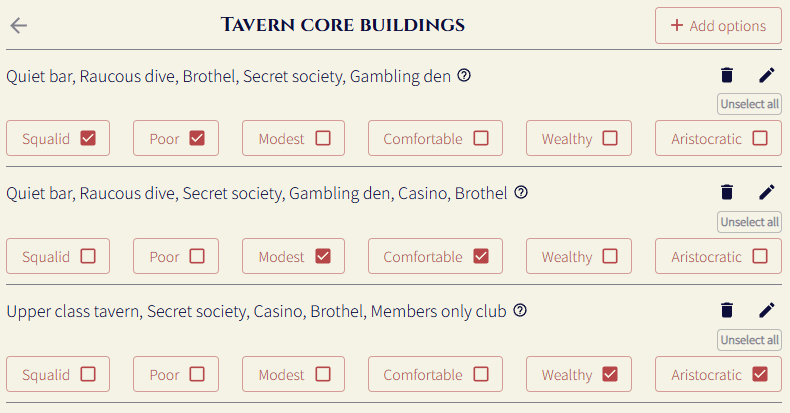
This means that if we want to create a wealthy/aristocratic tavern, we will use the pool defined on the bottom row.